 By Caleb
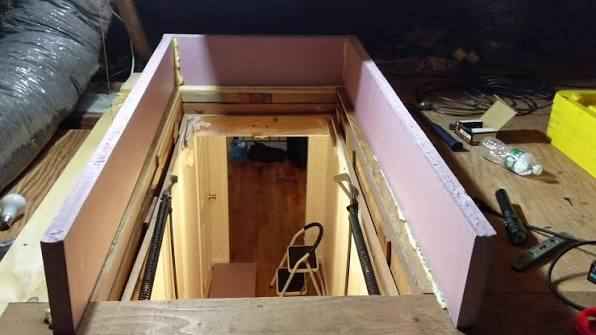
An unsealed attic stair opening is one of the largest remaining holes in an otherwise insulated home. The folding stair panel is usually a thin sheet of plywood, the frame rarely seals tightly against the ceiling, and the folding sections leave small gaps. Together they let conditioned air escape into the attic in winter and hot attic air drop into living space in summer.
The direct answer is simple: if your home has pull-down attic stairs or a ceiling hatch with no cover, an attic stair insulation cover is one of the cheapest, fastest energy upgrades available. A store-bought zippered tent installs in about fifteen minutes, a do-it-yourself rigid foam box takes an afternoon, and either one can noticeably reduce drafts in the rooms below.
Two separate problems make attic stair openings so costly. The first is air leakage: gaps between the stair frame and the ceiling drywall, plus the joints in the folding sections, give warm air a direct path into the attic. In winter, warm, moist indoor air rising through those gaps can condense on cold roof sheathing, and over time that chronic dampness can feed mold growth. Energy professionals often compare an unsealed attic stair opening to leaving a small window open around the clock. The second problem is missing insulation: the attic floor around the opening may carry R-38 or more, while the stair panel itself offers almost no thermal resistance. Sealing matters at least as much as insulating: a thick cover with gaps around its edges still leaks, while a well-sealed cover of moderate thickness usually outperforms a thicker one that does not seal.
You do not need special equipment for a first check. On a cold or windy day, hold the back of your hand near the edges of the closed stair panel and feel for moving air, and look for dark, dusty lines around the trim, sometimes called ghosting, which mark where air has been moving through gaps. An incense stick held near the panel edges shows drifting smoke where air escapes; keep flames away from insulation.
- Drafty rooms below: Rooms directly below the attic stairs feel drafty or colder than neighboring rooms.
- Ice dams: Icicles or ice dams form on the roof near the stair opening in winter, a sign escaping heat is warming the roof deck.
- Summer heat gain: The upstairs feels stuffy in summer even with the air conditioning running, because hot attic air drops through the opening.
- Dust lines: Dust collects heavily around the stair trim, indicating steady air movement through gaps.
Three main cover styles serve residential attic stairs. Zippered tents are soft, lightweight enclosures made from reflective foil and bubble insulation. They staple to the attic side of the frame, collapse out of the way, and open with a zipper, so they suit homeowners who climb into the attic regularly. Rigid foam boxes are sturdier enclosures built from foam board panels, either bought as a kit or built at home. They seal tightly and can reach higher R-values, but they must be lifted off and set aside each time you need access. Hinged or sliding units integrate insulation into a door that swings or slides open, the most convenient option for frequent access but also the most expensive. Simply laying a fiberglass batt across the folded stairs is the weakest option: it must be moved every time the attic is entered, it compresses with handling, and it provides no air seal.
| Cover style | Typical R-value | Access | Best for |
| Zippered attic stair tent | Around R-14 to R-15 (manufacturer figures) | Zipper opening | Regular access, standard openings |
| Rigid foam box (kit or DIY) | R-10 to R-20 by thickness | Lift off and set aside | Maximum sealing on a budget |
| Hinged or sliding unit | Varies by model | Swings or slides open | Frequent access, convenience first |
| Loose batt over the panel | Low in practice, compresses easily | Removed every time | Temporary fix only |
Most store-bought tents are sized for the common residential opening of about 25 inches by 54 inches, with roughly 11 inches of height for the folded stair sections. If your opening matches, a standard tent will fit. If it does not, you will need a larger tent, a trimmable kit, or a DIY box built to your exact measurements. Measure twice: a cover that is too small leaves gaps.
Inside opening: Measure the inside of the frame opening, length and width, from the attic side if you can do so safely.
Folded height: Measure the height of the folded stair sections above the attic floor, since the cover must clear them.
Outside of frame: Measure the outside of the frame too, because rigid foam boxes sit over the outside of the frame.
Obstructions: Note obstructions near the opening, such as roof framing or ductwork, that could interfere with a tall box.
Panel closure: Check that the stair panel closes fully and latches, since a cover cannot fix a panel that does not shut.
A zippered tent is the fastest route to a sealed opening. Work from the attic side, moving only on joists or boards laid across them: the floor between joists is ceiling drywall and will not hold your weight. Wear a dust mask, eye protection, and gloves, and work during a cool part of the day.
Clear insulation and stored items away from the stair frame so you can work around the full perimeter.
Staple the tent’s flange to the attic side of the stair frame, keeping the fabric taut but not stretched.
Check that the zipper opens and closes freely and the tent does not snag on the folded stair sections.
Seal the frame-to-ceiling gap from the attic side with caulk or low-expansion spray foam.
Close the stair panel from below and check from the living space that no drafts remain around the trim.
A DIY rigid foam box costs little more than a tent and usually seals better, because its flat bottom edge sits on weatherstripping around the entire frame. Two-inch foil-faced foam board gives roughly R-13 per layer, so two layers reach the mid-20s, close to much of the surrounding attic floor. Polyisocyanurate offers the highest R-value per inch; polystyrene is cheaper and easier to cut. Put the foil facing toward the living space, so it reflects heat back down into the house in winter.
Build a simple wood frame around the outside of the stair opening to give the box a flat, stable seat.
Cut foam board panels to fit over the outside of that frame, allowing for board thickness in your measurements.
Join the panels with foil tape on the outside seams, then tape or caulk the inside seams for a second seal.
Add a second layer of foam board on top, staggering the corner joints so no seam runs through both layers.
Stick self-adhesive weatherstripping to the bottom edge of the box, and set the box in place over the frame.
Many homeowners install a cover and still feel a draft, because the real leak is not the panel at all but the gap between the stair frame and the ceiling drywall. This gap is often hidden behind trim and can run around the entire perimeter. From the attic side, fill gaps up to about a quarter inch with caulk and larger gaps with low-expansion spray foam, taking care not to force foam into the stair mechanism. Weatherstripping the panel itself is the other half of the seal: self-adhesive foam tape around the panel perimeter compresses when the panel closes and blocks the small gaps in the folding sections. Foam tape is inexpensive but degrades in a few years, while EPDM rubber or silicone gaskets last far longer and are worth the small extra cost on a panel that is opened often.
Most failed attic stair covers fail for the same handful of reasons, and all of them are avoidable: buying the wrong size, skipping the frame-to-ceiling seal, or blocking attic ventilation by pushing insulation or a cover tight against the roof deck or over soffit vents. Keep covers clear of vents and baffles, since choked airflow keeps the attic damp.
- Crushing the cover: Compressing the cover under stored boxes, which crushes foam board and breaks the weatherstrip seal.
- Wrong tape: Using duct tape on foam board seams, which loosens in attic heat; foil tape holds up far better.
- Unvented exhaust fans: Sealing the opening but leaving bathroom or kitchen exhaust fans venting into the attic, which keeps pumping moisture overhead.
- Skipping the inspection: Ignoring existing moisture, mold, or vermiculite insulation before disturbing the area around the opening.
If you find vermiculite insulation, heavy mold, animal droppings, or damaged wiring near the opening, stop and get professional advice before disturbing anything. Vermiculite can contain asbestos, and mold or pest contamination needs remediation, not just a cover over the top. If the stair unit is old, warped, or unsafe, or the attic is hard to enter safely, hire an insulation contractor.
Costs below are estimates only and vary by region, opening size, and product choice. A zippered tent is the cheapest ready-made option; a DIY foam box costs slightly more in materials but nothing in labor. Energy savings depend on climate and how leaky the opening was, so treat payback claims as estimates.
| Option | Estimated cost | Time required |
| Zippered attic stair tent | $50 to $150 in materials | Under 1 hour |
| DIY rigid foam box | $75 to $200 in materials | One afternoon |
| Rigid foam box kit | $100 to $300 | 1 to 2 hours |
| Hinged or sliding insulated unit | $400 to $800 | Half day, often pro install |
| Contractor-installed cover | $150 to $250 per cover | Under 1 hour on site |
The rules change when the attic stair opening sits in the ceiling of an attached garage. There, the ceiling often forms part of the fire separation between the garage and the living space, and the standard thin plywood stair panel does not provide the required fire resistance. Building codes in the United States generally require openings in a garage-to-dwelling separation to be protected, commonly with a 20-minute fire-rated door or an equivalent assembly, and the panel must be self-closing and self-latching. A standard tent or foam box over an unrated panel does not make it rated, so use a fire-rated pull-down stair unit. Check with your local building department before replacing a garage-ceiling unit.
It can, but the saving depends on how leaky the opening was and on your climate. An unsealed opening in a cold climate leaks the most, so those homes tend to see the biggest improvement. Treat any specific savings claim as an estimate.
Yes, if the stair opening itself is uninsulated and unsealed. Insulation on the attic floor does nothing for the hole in the middle of it. The opening still needs its own cover and air seal.
You can as a temporary measure, but it performs poorly. Batts must be removed every time you enter the attic, they compress with handling, and they provide no air seal. A tent or foam box costs little more and performs far better over time.
Most homes use a 25-inch by 54-inch opening, and most store-bought tents are made for that size with about 11 inches of height for the folded stairs. Measure before ordering; older homes often differ.
A properly sealed cover reduces condensation risk, because it stops warm, moist indoor air from reaching cold attic surfaces. Problems arise when the cover is installed over an existing moisture source, such as a bathroom fan venting into the attic, or when attic ventilation is blocked. Fix exhaust routing and keep vents clear, and the cover helps rather than harms.
An attic stair insulation cover is a small project with a disproportionate payoff. It closes one of the largest leaks in the ceiling, adds real insulation where there was almost none, and reduces drafts and temperature swings in the rooms below. Check whether your opening leaks, measure carefully, and choose a tent for frequent access or a foam box for the tightest seal. Seal the frame-to-ceiling gap and weatherstrip the panel, because a cover over an unsealed frame only does half the job.